Sidelight Screen Repair
Summer has finally relented, and while the rest of the country is preparing to close up their houses, I'm getting ready to let in some fresh air. When I bought the house, the corner of the shed came stuffed with old wooden screens. A few of them even match the windows and doors in the house!

While most are in rather poor shape, the screens for the sidelights at my front entry were serviceable. Unfortunately, they were not painted along with the house and sported a slap-jab layer of peach on the front facade and dark green elsewhere that no longer matched the exterior color scheme. Exposed wood on the ends left the frames vulnerable to deterioration. With dreams of cool breezes in our future, my handy boyfriend and I decided to give these screens a makeover putting to use some of the basics we learned during a workshop on traditional screen building at The Green Project.
First up, we pulled off the screen molding and removed the old screening. Doing so revealed a ton of old staples and nails from years and years of repairs. We were certainly not the first to go down this road!
Next up, sanding. So much sanding.


Thank goodness we bought the higher quality primer! Regardless of the quality, these frames needed two coats. You can see how much of the old paint bled through with just one coat.

We also put a coat of primer on the new screen molding we bought at Lowe's. We did these at full length before we did any cutting to make the painting easier. We planned to touch up the ends once we cut them to size.

As with any painting project, we did a lot of sitting around watching paint dry, but we were lucky to have perfect weather for doing this in the backyard. Once the frames had two coats of primer, we moved on to a coat of exterior trim paint. I was fortunate to have enough paint left from the prior owner's repainting of the house to ensure we had a perfect match. My house has two exterior trim colors - white and what I can best describe as "nacho cheese." This yellow-orange color is on the exterior of the sidelights, transom, and porch, but when I opened the can of paint, it looked exactly like that processed cheese product poured on your nachos at the movie theater or ballpark. I decided that I didn't really want to see this color from the living room looking out, so we painted the frames white on all sides. While B was a bit wary at first, I chose to paint the screen molding in the nacho cheese yellow.

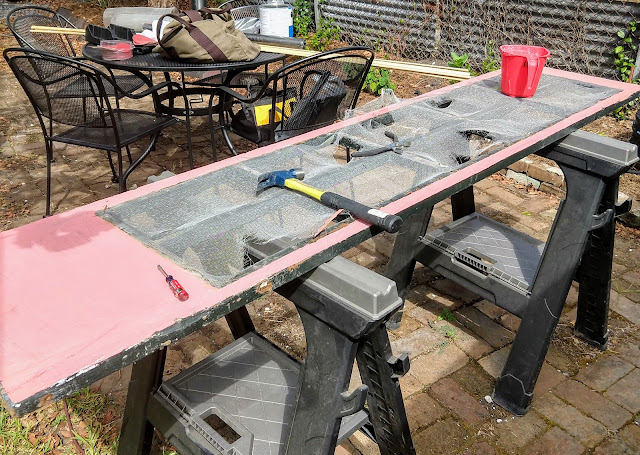
Once everything was painted and dry, we moved on to the screens. We chose a standard fiberglass screen mesh to replace the old aluminum screens. It's flexible and easy to cut with scissors or an x-acto knife. We rolled out the mesh and got to work stapling it to the frame with a staple gun. As we learned in the workshop, we left plenty of overlap to cut away at the end and made sure to pull the mesh taught as we went. This is definitely a job best done with two sets of hands to help keep it consistent. We then used the hammer to make sure all the staples were flat. Due to the myriad of old nails and indents from past staples, we had a few miss-fires, but as these will be covered with the molding, it wasn't an issue. We just pulled out the crumpled staple and fired another one in adjacent to the failed one.

Next up, we measured and cut the screen molding for each length and cross piece. B used a hand saw with a miter box for this task.

Like anything in an old house, nothing is square or even, so we measured each individual run and cut to measure. I labeled the back side of each piece as we went. I also used a small brush to coat the cut ends in paint so we didn't have any exposed raw wood. (More watching paint dry!) Finally, we nailed each piece of molding into place over the screens and used the x-acto blade to cut the screens to size. The next day, I touched up the molding and covered the nail heads with a little more paint while the screens fully dried and cured in the shed.

The following weekend, the weather just begged for open windows, so we installed the finished product in the sidelights. B and I both agree that painting the molding yellow was the right call. I really like the contrast, and it coordinates well with the transom. It's so nice to let in some fresh, cooler air after a long, hot summer!

Chicory also approves!


While most are in rather poor shape, the screens for the sidelights at my front entry were serviceable. Unfortunately, they were not painted along with the house and sported a slap-jab layer of peach on the front facade and dark green elsewhere that no longer matched the exterior color scheme. Exposed wood on the ends left the frames vulnerable to deterioration. With dreams of cool breezes in our future, my handy boyfriend and I decided to give these screens a makeover putting to use some of the basics we learned during a workshop on traditional screen building at The Green Project.
First up, we pulled off the screen molding and removed the old screening. Doing so revealed a ton of old staples and nails from years and years of repairs. We were certainly not the first to go down this road!

Next up, sanding. So much sanding.

B did his best to take off as much of the layers of peach, green, and blue paint as he could to prep the surface for primer and paint. I followed after him with wood putty to fill in some of the dents and larger holes left from old nails and staples. We did another light sanding once that dried, then wiped everything down to remove any dust.

Thank goodness we bought the higher quality primer! Regardless of the quality, these frames needed two coats. You can see how much of the old paint bled through with just one coat.

We also put a coat of primer on the new screen molding we bought at Lowe's. We did these at full length before we did any cutting to make the painting easier. We planned to touch up the ends once we cut them to size.

As with any painting project, we did a lot of sitting around watching paint dry, but we were lucky to have perfect weather for doing this in the backyard. Once the frames had two coats of primer, we moved on to a coat of exterior trim paint. I was fortunate to have enough paint left from the prior owner's repainting of the house to ensure we had a perfect match. My house has two exterior trim colors - white and what I can best describe as "nacho cheese." This yellow-orange color is on the exterior of the sidelights, transom, and porch, but when I opened the can of paint, it looked exactly like that processed cheese product poured on your nachos at the movie theater or ballpark. I decided that I didn't really want to see this color from the living room looking out, so we painted the frames white on all sides. While B was a bit wary at first, I chose to paint the screen molding in the nacho cheese yellow.

Once everything was painted and dry, we moved on to the screens. We chose a standard fiberglass screen mesh to replace the old aluminum screens. It's flexible and easy to cut with scissors or an x-acto knife. We rolled out the mesh and got to work stapling it to the frame with a staple gun. As we learned in the workshop, we left plenty of overlap to cut away at the end and made sure to pull the mesh taught as we went. This is definitely a job best done with two sets of hands to help keep it consistent. We then used the hammer to make sure all the staples were flat. Due to the myriad of old nails and indents from past staples, we had a few miss-fires, but as these will be covered with the molding, it wasn't an issue. We just pulled out the crumpled staple and fired another one in adjacent to the failed one.

Next up, we measured and cut the screen molding for each length and cross piece. B used a hand saw with a miter box for this task.

Like anything in an old house, nothing is square or even, so we measured each individual run and cut to measure. I labeled the back side of each piece as we went. I also used a small brush to coat the cut ends in paint so we didn't have any exposed raw wood. (More watching paint dry!) Finally, we nailed each piece of molding into place over the screens and used the x-acto blade to cut the screens to size. The next day, I touched up the molding and covered the nail heads with a little more paint while the screens fully dried and cured in the shed.

The following weekend, the weather just begged for open windows, so we installed the finished product in the sidelights. B and I both agree that painting the molding yellow was the right call. I really like the contrast, and it coordinates well with the transom. It's so nice to let in some fresh, cooler air after a long, hot summer!

Chicory also approves!


Comments
Post a Comment